Sunday 2 July 2017

How to Pitch Yourself: Scholarships and University Clubs

Scholarship applications consumed most of my life last year and became a bit of an expert on how to sell yourself and put your best foot forward. I thought I would share some of my top tips for application writing and interviews; many of these have come in handy when applying for university clubs as well!

After applying for over 30 scholarships last year, gaining three University scholarships and having a number of terrifying interviews at corporate firms, I thought I would give your my secrets on the DOs and DON'Ts of pitching yourself.

Writing an application:


DO:
  • Format your CV so it is easy to read and eye-catching. I listed simple key attributes in a left-hand column and listed extra details and experiences in the body of my CV.
  • Section off information that differentiates yourself, for example, I was heavily involved in volunteering and dedicated a section especially to listing the organizations I helped. I had a separate section for leadership roles as well.
  • Use your resources! Hold regular meetings with your careers advisors, ask friends, family and teachers to look over your applications to make sure everything is perfect!
  • Adapt your CV and answers to emphasise certain aspects that are important to where you are applying.
  • Be genuine. Discuss your strong points, discuss your weaknesses (if asked in the application) and always include examples to back up anything you say.
  • Link your answers back to the organisation or club specifically. For example, in one application I wrote "I have a strong willingness to learn and bring quite a fresh perspective to various new situations. I am also great at brainstorming ideas and keep up with the common trends. This means especially within the events subcommittee I can recognise what is more likely to attract the most people. I have very practical skills and the ability within a team to recognise everyone's benefits and bring them together to further a common goal." 
DON'T:
  • Be too detailed with descriptions of all your past activities. Most applications are just an overview of you as a person, and more detail of particular experiences can be expressed during interviews.
  • Exceed the word or character count.
  • Use a generic CV template or send the same CV to every application.
  • Show off or be cocky in your application, rather, be honest and humble.
Top Tips for Interviews:
  • Dress professionally and greet them professionally. Always try to remember the interviewers' name and use it! Most of the time there will be more than one interviewer so share eye contact and interact with both of them even if one is simply a scribe.
  • If it is an external organisation or fund (not from a university), do your research on their values, what they actually do as it is not uncommon to be asked what you know about them.
  • Always prepare genuine questions you would like to ask them to include at the end of the interview when they ask "so do you have any questions you would like to ask us?" This shows you've actually thought about your application and how you fit into their organisation.
  • BANTER/ Building rapport is KEY: When you get into the interview maintain a balance between professionalism and building some good banter back and forth. Sometimes I like to ask questions about their own personal experiences if they ask an interesting question. Always try and sense the interviewer's personality and fit your vibe to theirs so they like you as there's always an element of subjectivity in interviews. I've cracked so many jokes with interviewers and once even described myself as an 80 year old trapped in an 18 year old's body; these can make your interview stand out amongst others!
  • Introductions and Conclusions for answers are a great tool to practice. If you're unsure of how to start an answer and need a few minutes start with "Well that's actually a really good question...". If you feel like you're going on a tangent bring your answer back to the original question asked. 
  • Prepare plenty of situations and challenging experiences before your interview and practice these aloud. From my experiences, there are plenty of challenging questions that will ask you to refer to specific situations. Remember what you have discussed in the interview and in your application as they will often bring up details you have talked about e.g. Discuss a time you found a task challenging and how you overcame this? Did you encounter any problems when you were involved in ... Even with generic answers it is better to back up your statements about your qualities with personal experiences that prove you possess these.
  • Be up to date with current news and what is going on in the world. Be passionate about certain issues because they will often ask what you've been interested in recently in the world.
(You can pick up my favourite #girlboss networking and interview heels here.)

All in all, be honest, be genuine and make your personality shine whether it be in an application or in person during an interview. I strongly encourage you to step up and apply for as many clubs, scholarships and experiences as possible as these can help you meet some awesome friends or even just to gain more interview experiences to build on your skills.

I hope these tips helped and make sure you leave a comment or flick me a message if you would like to gain more advice regarding applications.

Best of luck,


Monday 29 May 2017

What should you know in Year 13? What have I learnt as a University student?

I know Cindyscraftycraves has been dead for a while now but as per request from a few of my aggressively encouraging friends, I thought I’d pop by every now and again to share some words of advice based on my experiences at uni thus far.

Where have I been?

I graduated at the end of last year and moved to the University of Sydney in February to study a Bachelor of Commerce (liberal studies) majoring in Management, Marketing and Economics. I’m taking psychology in the science part of my course and am very much still volunteering getting involved in the V club here at uni.

Reflecting back on high school life, what did you learn in year 13 that was most helpful for university?

As cheesy as it sounds, set your goals high and work hard at it. I knew that I would not be satisfied with myself unless I got into an Australian university. I wanted to live elsewhere in the future and thought moving to Australia from NZ would be the perfect opportunity to do so. I did plenty of research before, talked to older friends about their experiences and calculated my odds of getting in.

This meant taking every possible opportunity to do well at school by applying for 30 scholarships (not even kidding you), asking my teachers to give me extra external exams so I had more chances of getting better grades (yes, I literally took 3 extra exams last year) and becoming best friends with the careers counsellors by meeting with them almost every week. I know this makes me sound like a crazy over-achiever, but I can tell you that when I pushed myself, I achieved so much better and reached more of my potential.

All in all, network in high school, set high goals for yourself and get involved because in the long term these are not only things you can talk about in scholarship interviews, but also amazing life experiences you can look back on.

What have I learnt so far at university?

Although everything you do in high school is super important to get to this next stage of your life, in reality none of what you did matters anymore. No one cares if I was deputy head girl last year, or if I was a scholar but you get to apply these skills you have learnt from your high school experiences and extra-curricular activities into your everyday life. It’s a good opportunity to start afresh and build up your resume again which is both daunting, but also extremely refreshing.

High school and university are very different. Just because you worked super hard like you did in high school doesn’t mean you will get an amazing grade, and I learnt this the hard way. Don’t set your expectations too high, especially if you’re moving overseas for university as there’s a period of adjustment you need to balance too. Especially for my subjects it was almost impossible finding past papers so I really had to do extra research outside of the content learnt and ask for help when needed. At my university there are student study centres and peer assisted learning sessions to give us extra help if needed, but it is your responsibility to go and seek these resources.

Self-management skills are fundamental to functioning as a university student. Make sure you balance your life by scheduling time for yourself, studies and social activities. I’ve tried to do this by joining the gym, getting a job and joining various other extra-curriculars so I am not so caught up in an endless routine of studying everyday, going to uni and sleeping.


I feel like this post is a messy jumble of tips and advice. I don’t want it to get too long so I’ll stop my tangent for now but if you want to see another post on how to apply for scholarships/Australian universities or extra advice on settling into a new environment let me know! Feel free to contact me too, I’m happy to help! 😊

Bye for now,

Friday 4 March 2016

DIY Picnic Basket Pet Bed | Upcycling Vintage Finds

Hey everyone!
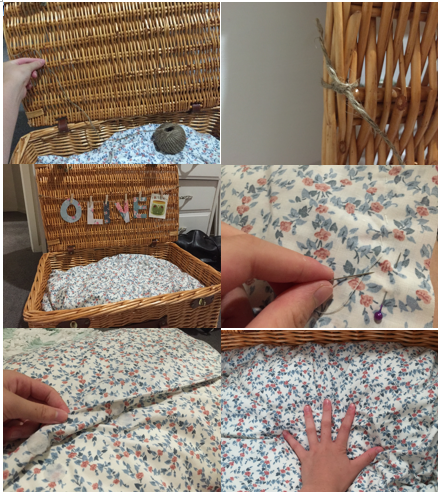
I've always wanted to make a cute cat bed so I've been browsing around vintage stores for a while for inspiration for this project. I stumbled across this super cute picnic basket and upcycled it into this adorable cat/dog bed :D It was SO EASY and I think it goes with the shabby chic theme of my bedroom.
Here come the shameless photos of my cat Olive modelling hahaha. Yes, I acknowledge how this is moderately creepy.
You will need:
  • Twine
  • Small wooden pegs
  • Pillow inner
  • Pillowcase, bought or made yourself.
  • Picnic basket
  • Scrapbook paper and printables of your choice
Method:
  1. For the bunting: Cut a length of twine, thread it through the sides of the picnic basket lid and tie it in place.
  2. Cut out your pet's name out of scrapbooking paper or printables of your choice and peg it to the twine.
  3. For the padding/pillow: Either just cover a pillow with a pillowcase in a fabric of your choice. Or sew your own pillowcase - the envelope method is the easiest, it takes like 2 seconds lol.
  4. To do this, measure your fabric and flip it back side up. Overlap your fabric at the back of the pillow and sew along the open seams leaving the overlapped fabric as it is. Next I just superglued some velcro dots to the envelop opening at the back to open and close the pillow case. Check out this DIY for more detailed instructions.
  5. Lastly, stuff your pillow into the picnic basket and you've made a super comfortable bed for your pet!
I hope you guys thoroughly enjoyed photos of my cat haha and this craft. I've got a few more posts coming your way as well so stay tuned for that in the next couple of weeks!

Bye for now,

Saturday 13 February 2016

Starting off the School Year Fresh + Free DIY Calendar Download

Hi everyone!
Since it's back to school season I thought I'd share some of my tips to starting off the school year fresh, getting organised and getting the most out of school. At the end of this post I'll includes photos and a link to a DIY wall calendar for this year to help you get organised.
Tips to Starting the School Year:
  1.  Be on time and stay organised in general. To do this I would HIGHLY recommend a planner where you can write all the homework assigned to you, meetings and extra-cirricular activities you may have. I find colour co-ordinating really helpful where I highlight my lunchtime meetings in yellow, afterschool or before school extra-cirriculars in pink and underline when homework is due in red. This is pretty pedantic because I'm always so busy (as above) but you can set up a system that suits you.
  2. Check your course outlines. To get an outline of what you'll be studying throughout the year I would highly recommend either buying or borrowing some textbooks for your subjects and having a flip through so you can get a rough idea of where you may need extra help/start studying earlier. 
  3. Participate in extra-cirricular activities. I know this is what the teachers tell everyone to do every year but this is honestly one of the most rewarding parts of school in my opinion. I ADORE getting involved and staying busy in various school groups because it helps me get involved in the wider community and allows me to meet new people and make new friends from all different year levels and schools. Without all the extra-cirriculars I have been involved in, I would not be as confident, extroverted and morally-strong of a person that I am today.
  4. "Be kind to one another." - Ellen Degeneres. I'm serious though. Be approachable and friendly to both your peers and your teachers. I don't understand why some people are just plain disrespectful towards teachers. Don't be that type of person that distracts others in class. I would encourage you to be the nerd who actually does their work because you only get one shot at a decent education. Don't take these privileges for granted when so many young girls and boys across the world aren't even given the right to an education.
  5. Find your study environment. Something I only started realising later on was how helpful a designated study environment would be! I found studying in the local library almost every day afterschool, especially leading up to the exam periods was particularly helpful because I was able to finish my homework before coming home and relaxing.

DIY Printable 2016 Wall Calendar


The website I found these from has a link to the printables at the end with 20 different styles of calendar printables. To make a yearly calendar with different styles like mine you need to print off some patterns in different months and alternate them. For example, printing off the metallic dots calendar for only March and November (so pages 3 and 11) and repeating this for the different styles that you want. Click here for the link to the printable.
I hope you guys really enjoyed this blog post. :) I have another usual crafty upcycling DIY coming your way in a week or so, so look forward to that.

Bye for now,


Wednesday 6 January 2016

My 2016 Goals/New Years Resolutions + DIY Memory Jar

Hey everyone! Happy New Year!
I hope you guys are already having an amazing year and I'm really excited for what's to come in 2016. I loved the memory jar that I made last year and looking through it and reflecting on moments at the end of 2015. If you guys would like to see my last years post on my resolutions and memory jar click here. Psst also do you like my new blog header/banner?

Pretty self explanatory but I used double sided tape to stick on the 'sparkle and shine' cut out. I double wrapped some thin ribbon, cut out and hole punched some scrapbooking paper and wrote 2016 in silver pen to make a tag.

My 2016 New Years Resolutions:
Disclaimer: I know a lot of people dislike New Years Resolutions because they want to constantly grow and develop throughout the year. But I feel like that's sort of a given and I take the new year as the perfect opportunity to set goals for myself.
  1. Experience life more spontaneously. I feel like many people these days have become quite consumed by digital media, with their phones constantly out and living life through this screen. I feel like I've started to become guilty to this. I'm going to try and limit my constant need to be capturing memories through photos but instead try and experience these moments first-hand.
  2. Volunteer for ten organisations. I really want to try and assist different organisations within the community by volunteering for ten different organisations. I really value giving my time and helping others through the use of volunteering so hopefully I can accomplish this goal.
  3. Step more outside of my comfort zone. I'm someone's who is always really happy in my own little bubble of comfort but hopefully I can make an active effort to try new things even if I'm not 100% comfortable with it.
  4. Be OK with not reaching expectations. As someone who sets very high standards for myself I often don't feel happy with not reaching this standards even if I have achieved to the best of my abilities. In 2016 I want to learn to set more realistic targets for myself and to be OK with not getting the best mark possible or not reaching my expectations as long as I have tried my best.
  5. Give myself 'me time'. I always tend to put all my priorities, other responsibilities and other people before myself because I've felt they're more important. However, this year I'm going to try and make an active effort to give myself more time to chill out and ~breathe~ (hopefully).
I hope you guys enjoyed this blog post! I would love to read what your 2016 goals are or whether any of mine have inspired yours at all. I hope you had an amazing new years and let's welcome 2016 with a passionately positive spirit :)
Bye for now,

Tuesday 22 December 2015

10 Holiday Ideas + Activities to do with Friends

Hello everyone!
I find that often when you don't make any plans or run out of ideas holidays can become boring and uneventful. Luckily for you, I've compiled together a lovely list of cool activities, places to explore and things to do around Auckland which I enjoy during the holidays.
#1: Food Markets
Often around Auckland City's Waterfront there are public food markets held that offer all sorts of amazing treats from food trucks. I always take a look around Facebook events to find upcoming markets, many of these are also often themed from different exotic cultures.
A market going on this holidays is Food Space in Silo Park on every Wednesday through summer from December 2nd. "Head to the beautiful waterfront location from 5pm each Wednesday to share delicious street food and cold drinks with the neighbourhood, meet a local and soak up the phenomenal entertainment." 

#2: Fun Activities for a Big Squad
I love to get out with a larger group of friends and go ice skating or play laser tag. Laser tag is such a competititve game that is intense but so much fun. Many of the Megazone laser tag branches also have activities other than laser tag too; such as Bumper Cars, Mini golf and an Arcade. Ice skating isn't for everyone so other ideas are to go bowling and play snooker/pool.
#3: Beach Day Out
Pretty self explanatory but you could hang out with a group of friends at the beach and go for a swim in the hot summer holidays to cool off. Make sure you check the weather report and I like going to a more secluded beach as well. 
#4: Craft Markets
One thing I like just as much as making crafts is buying craft supplies and craft shopping. Me and a friend got together to go to a pop up craft market by Crafternoon Tea which organise a bunch of other craft markets in Auckland. I loved seeing all the creative things other people had made too. This was one of the best days this holidays and we spent so much money but it was so worth it.
#5: Korean BBQ and Karaoke
For a more cultured experience a really fun day out with a group of my friends was when we went to Karaoke and a Korean BBQ Buffet restaurant afterwards. The best place for this awesome modern Korean experience is Auckland City as there are a few Korean BBQ restaurants there and 2 or 3 Karaoke Bars to choose from too.
#6: Picnic in the Park
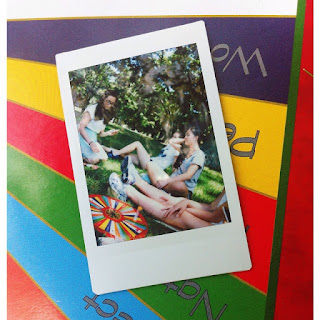
This is a classic that I love to do every holidays, we had a Christmas themed picnic this year. Head out to your local park with a group of friends and a bunch of food to have fun chatting away. Activities I love to do are play Never Have I Ever, Charades and Articulate. Make sure you bring speakers and have a hilarious dance party in a public park too.
#7: Crafty Times with Friends
I love crafting (duh) and its even more fun with friends. You could search up on Pinterest some fun ideas to do together and you could end up with two super cute handmade items. I also love watching a movie or playing some music while making crafts at the same time.
#8: Thrift Shopping
One of my favourite things to do is go Op shopping with friends! It's so much fun looking for great unique items of clothing at affordable prices and little nick nacks to upcycle or decorate. My favourite place to go thrift shopping is in Onehunga, as there's a massive store called Savemart there and smaller stores in the main Onehunga area. Ponsonby is another great place with plenty of smaller second hand boutiques and designer op shops scattered up K road and on Ponsonby Road.
#9: Volunteer

If you have some spare time and want to help others in the community try your hand at volunteering! Some places you can even sign up for a few days in advance. My friend May and I decided to volunteer by gift wrapping in Sylvia Park a few times and it was so much fun, we met some great people and were able to collect donations to go towards Volunteering Auckland through this.
#10: Exploring a New Place
Choose a new suburb or place you've never really visited to explore with a few friends! A few years ago when I did this in Onehunga with some friends we discovered the most beautifully disorderly bookshop ever. Now whenever I go to Onehunga I always have to visit this special place.

I hope you guys found this blog post helpful if you're ever stuck on ideas of things to do this holidays. Shout out to my friends who've done all these activities with me before and thus given me the inspiration and content for this post <3

Bye for now,


DIY Christmas Party Treats and Decoration Ideas! [Huge Post]

Hey everyone!
Recently me and a few other people threw an adorable surprise Birthday party for a friend who is obsessed with Christmas. I along with my friend Laura made a bunch of cute snacks and we all decorated her house to a Christmas theme. I think these snack ideas would be perfect for a party on Christmas day!
Treat #1: Candy Cane Shortbread Cookies
Ingredients;
  • Shortbread cookies, you could bake them but I bought mine from Countdown because I'm lazy
  • Candy Canes or festive sprinkles
  • Milk chocolate
Method:
  1. Crush your candy canes, I crushed them with a mug because I'm sophisticated and classy
  2. Melt milk chocolate in the microwave using 20-30 second intervals
  3. Dip half of your shortbread cookie into the chocolate and sprinkle on crushed candy canes or festive sprinkles
  4. Sit the cookies for in the fridge for a bit for them to set

Treat #2: Reindeer Cookies


Ingredients:
  • Pretzels
  • Cashews
  • Dark chocolate drops
  • Milk Chocolate
  • Jaffas
  • Cookies of your choice
Method;
  1. Chop your pretzels in half and a handful of cashews lengthwise using a knife
  2. Dip two dark chocolate drops into milk chocolate and stick them on the cookies as eyes
  3. Then using milk chocolate again, stick on the jaffa as a nose (a snout? idek)
  4. Using the same technique again, spread milk chocolate on the cashew and stick it on as a smile
  5. You guessed it, dip a bit of the pretzel into the milk chocolate and stick to the sides of the cookie
  6. Leave the cookies on baking paper in the fridge to set for 30 minutes.

Treat #3: Festive Popcorn (the BEST popcorn ever)

Ingredients:
  • Caramel dipping sauce (the ones you get near the strawberries in the supermarket)
  • Lightly buttered microwave popcorn
  • Milk chocolate
  • Dark chocolate
Method:
  1. Crush your candy canes in a zip lock bag
  2. Spread your popped popcorn onto a baking tray
  3. Using a spoon or fork flick your wrist (click the link) to flick on the caramel, milk chocolate and dark chocolate
  4. Sprinkle on the crushed candy canes
  5. Set in the fridge for 30 minutes or so
  6. I used a spatula to transfer the popcorn into little cellophane bags, folded a paper doily in half and stapled the bag closed with it.

Treat #4: Hot Chocolate Spoons
These spoons are so cool, simply stir into warm hot chocolate until melted to intensify the flavour. The candy cane pieces also give your hot chocolate a delicious subtle peppermint taste.
Ingredients:
  • Wooden spoons or metal spoons (plastic spoons could melt if your hot chocolate is too hot)
  • Milk chocolate
  • Dark chocolate
  • Crushed candy cane
Method:
  1. Melt both the milk chocolate and dark chocolate using 20-30 second intervals in the microwave.
  2. Spoon the milk chocolate into the wooden spoon.
  3. Drizzle on your dark chocolate
  4. Sprinkle on your crushed candy cane bits
  5. Set in the fridge to harden for 30 seconds or so. I used a chopstick under the handles while it set to balance the spoons so the melted chocolate wouldn't drip over the edges.

Treat #5: Candy Cane Hearts
(Thanks to Laura for the recipe!)
Ingredients:
  • Candy Canes
  • Milk chocolate
  • White chocolate
Method:
  1. Cut 2cm off the bottom of the candy cane and arrange it into a heart
  2. Crush the left over candy cane bits
  3. Melt white chocolate and milk chocolate and leave to cool for around 10 minutes at room temperature or 5 minutes in the fridge
  4. Use your own judgement to see whether the chocolate is thick enough to be spooned into the centre but won't leak out the sides
  5. Sprinkle the candy cane bits on top and put them in the fridge on baking paper for 10 minutes.
Treat #6: Melted Snowmen Cookies
Ingredients:
  • Cookies of your choice (we used digestives)
  • Icing Sugar
  • Water
  • Food colouring (black and orange)
  • Marshmellow (the bigger the better)
Method:
  1. Mix icing sugar and water to form the icing and spread over the cookie in an imperfect wiggly fashion (because snowmen don't melt perfectly circular)
  2. Stick on the marshmellow before the icing sets
  3. Make a thicker mixture of icing using more icing sugar and a bit of water and dye some with black food colouring and a bit with orange food colouring
  4. Put the icing in a icing squeezer and draw on your snowmans features
  5. Serving suggestion: Use a black slate and dust on icing sugar like snow!
Other Treats:
We had pink and green Bundaberg drinks which were the closest colours we could get to Christmas colours hahaha.
Laura also baked an amazing chocolate Birthday cake and we had sparkler candles (that failed but let's not dwell on that).

Decoration Ideas:


  • We made a quick garland by tying balloons to a piece of string (which you could always do in Christmassy colours).
  • We also folded paper doilies in half, stapled them onto a string and wrote "Happy Birthday" across them because it was for our friends Birthday, but you could always just write "Merry Christmas" instead.
  • A beautiful Christmas Tree was set up
  • We had a Christmas music playlist set up
  • Little Santa Claus nick nacks were everywhere and some food was served on Santa Clause plates
  • Christmassy candles were lit e.g. pine, vanilla scents
  • Other ideas: you could also play Xmas charades and watch a Xmas movie

~THE END~
I hope you guys enjoyed this blog post and are having an amazing holiday and Merry Christmas!

Bye for now,